Thursday, 18 June 2015

How to Configure DNS and SSL for SharePoint 2013 Apps

One of the greatest additions that was introduced in SharePoint 2013 is the app model. This allows for stand-alone apps that add additional functionality to SharePoint. They can be hosted in a SharePoint environment or hosted completely outside of SharePoint by the provider themselves.
Configuring SharePoint 2013 to use apps is actually fairly straightforward and easy. Microsoft has documented most of it in their Technet blog. However, two of the most common questions I’ve been asked are due to confusion around the DNS configuration and how to actually apply the SSL for apps.

Part of this confusion is centered on how Microsoft recommends configuring DNS and how most admins are used to applying SSL certificates. Yes, these two issues are related, so if you came here wondering how to apply your app domain’s SSL, then you may have already run into an issue like this with your SSL secured SharePoint site:

SSL secured SharePoint site

So, today I’m going to talk through the DNS and SSL configuration for SharePoint 2013 apps. (If your site isn’t using SSL, then you could skip that part I guess, but why not stay along for the ride anyways?)

Part 1: DNS Configuration

Step 1: You will need to acquire an app domain.
It is strongly recommended that this domain is separate from your site’s domain. For example:
Example Site = mytestsite.onfpweb.net
Example App domain = onfpwebapps.net (completely separate from onfpweb.net)
Step 2: Configure DNS for both the site and the app domain.
So first, let’s talk about what the URL of an app would be.
Whenever a new app is added into SharePoint, it will be given a unique name with the app prefix and an app ID. In my example, it would look something like app-7422a132061cd3.onfpwebapps.net. So each app will have a URL that will be a unique sub-domain of your chosen app domain. It would become a little monotonous to keep adding new ‘A’ records in DNS for each app that you add. This is why we’ll be configuring the wildcard CNAME record in step 2c below:
  • Note: If you want to test the app store locally on your server then you’ll need to configure DNS in your SharePoint environment’s domain’s DNS.
  • Note: If your users will be using public DNS to access the site, then the following DNS records would need to be created on your public DNS servers for your site and your app domain as well.
Below is an example of the DNS configuration in my test server’s DNS settings using internal IP’s. Obviously for public DNS, I would be using the external IP’s instead.
2a. If they are not already created, then create two new Forward Lookup Zones for your site and app domain:

Forward lookup zones for your site

2b. Create an ‘A’ record for your SharePoint site. (It is “mytestsite.onfpweb.net” in my example):

Create an ‘A’ record for your SharePoint site

2c. Create a wildcard CNAME record for your app domain that points to your site URL

Create a wildcard CNAME record for your app domain

points to my site’s Fully Qualified Domain Name

(In my example, the wildcard record for my app domain, “*.onfpwebapps.net” points to my site’s Fully Qualified Domain Name “mytestsite.onfpweb.net”.)
What the wildcard CNAME record is doing is directing any traffic that goes to somerandomurl.onfpwebapps.net (app domain) towards mytestsite.onfpweb.net (the SharePoint site’s FQDN):

wildcard CNAME record directs traffic

Part 2: Configuring SSL

Remember when we created the wildcard CNAME record for our app domain to use? This technically means that anyrandomurl.onfpwebapps.net will be pointing to the same IP address as my SharePoint site. So let’s talk about IIS bindings and how they relate to this situation:
IIS bindings

Every IIS site must have a unique binding. That means that some combination of the IP address, port and host name has to be unique on the server. This is to prevent any conflicts of multiple sites trying to serve the same requests.
Before IIS 8, in order to have multiple SSL’s, the most common thing to do was to use a different IP address for each SSL site. This is due to the fact that you couldn’t specify host names in the bindings for an SSL site. This leads back to the situation I’m in with my app domain configuration. My app domain is pointing to my site’s FQDN in DNS which means that it’s using the same IP address. So how will we work that out?

Step 1: Acquire a wildcard SSL for your app domain. 
(In this scenario, it is assumed you’re already using SSL for your SharePoint site itself.)
Since I’m doing this in a lab environment, I am just using a self-signed certificate. In a production environment, you will definitely want to purchase the wildcard certificate from a 3rd party certificate authority.

purchase the wildcard certificate

Step 2: Create a placeholder web application for your app domain
This step isn’t technically necessary since you can add the additional app domain binding to one of your other SharePoint sites in IIS, but I like to do it to separate my SSL bindings to different sites in IIS. This web application will have no site collections since it’s not actually hosting any app content (remember that SharePoint apps can be hosted off the SharePoint server itself). It’s basically just going to serve as a placeholder:
no site collections in the app domain
(Screenshot showing that there are no site collections in the app domain placeholder web application)

alternate access mappings

(Screenshot showing the alternate access mappings for this web application)

Step 3: Update IIS bindings to use the SSL’s
This is where the magic is going to happen. The reason we can use multiple SSL certificates with the same IP address in IIS 8 is because of the new Server Name Indication option (SNI for short). This allows us to specify host names for SSL secured sites. Here are the bindings for my two SharePoint web applications:
My app domain’s placeholder web application has one HTTPS binding that is using the wildcard certificate and no Server Name Indication (since SNI requires that you specify one host name and each app would be using a different host name).
app domain’s placeholder web application

My SharePoint site’s web application’s bindings also have one HTTPS binding that uses the site’s specific SSL certificate. This binding is using the SNI option to specify the host name:

SharePoint site’s web application’s bindings

I added a simple app part to the home page of my SharePoint site and confirmed that I am no longer receiving any SSL certificate warnings for my site or the embedded app.

Adding app to SharePoint site homepage

Hope that helped! Thanks for reading!

Microsoft SharePoint 2013: SSL Certificate Installation Instructions

SharePoint 2013: Installing Your SSL Certificate

  
Microsoft SharePoint 2013 does not include a GUI for installing the SSL Certificate. Because SharePoint 2013 is designed to run on Microsoft IIS 8, you can use IIS. If you have not yet created a Certificate Signing Request (CSR) and ordered your certificate, see Microsoft SharePoint 2013: SSL Certificate CSR Creation Instructions.

The SharePoint SSL Certificate installation process consists of three steps:
  1. Installing the SSL Certificate
  2. Assigning or binding the certificate to your SharePoint site
    See Using IIS 8 to Assign the Certificate to the SharePoint Website.
  3. Installing the root certificate
    See Using SharePoint 2013 to Install the Root Certificate.

SharePoint 2013: How To Install Your SSL Certificate

Using IIS 8 to Install the SSL Certificate

After DigiCert validates and issues your SSL Certificate, you can use Microsoft IIS 8 to install your SSL Certificate to the server where you generated the CSR, and then, bind it the SharePoint site.
  1. Save the SSL Certificate file (your_domain_name.cer) to the server on which the CSR was generated.
  2. Open Internet Information Services (IIS) Manager.
    From the Start screen, type and click Internet Information Services (IIS) Manager.
  3. In Internet Information Services (IIS) Manager, under Connections, select your server’s Hostname.
    IIS 8 Security Certificates
  4. In the center menu, in the IIS section, double-click the Server Certificates icon.
  5. In the Actions menu, click Complete Certificate Request to open the Complete Request Certificate wizard.
    IIS 8 Complete Request Certificate
  6. On the Specify Certificate Authority Response page, under File name containing the certification authority’s response, click … to browse to the .cer certificate file that DigiCert sent you, select the file, and then, click Open.
    IIS 8 Specify Certificate Authority Response
  7. Next, in the Friendly name box, enter a friendly name for the certificate. The friendly name is not part of the certificate; instead, it is used to identify the certificate.
    We recommend that you add DigiCert and the expiration date to the end of your friendly name, for example: yoursite-DigiCert-expirationDate. This information helps identify the issuer and expiration date for each certificate. It also helps distinguish multiple certificates with the same domain name.
  8. Next, in the Select a certificate store for the new certificate drop-down list, select Personal.
  9. To install the SSL Certificate to the server, click OK.
  10. Once you have successfully installed the SSL Certificate to the server, you still need use IIS to assign or bind that certificate to the SharePoint site.

Using IIS 8 to Assign the Certificate to the SharePoint Website

  1. In Internet Information Services (IIS) Manager, under Connections, expand your server’s name, expand Sites, and then select the SharePoint site.
    iis 8 manager
  2. In the Actions menu, under Edit Site, click Bindings.
  3. In the Site Binding window, click Add.
    IIS 8 Site Bindings window
  4. In the Add Site Bindings window, enter the following information:
    Type:In the drop-down list, select https.
     
    IP address:In the drop-down list, select All unassigned.
    If your server has multiple IP addresses, select the one that applies.
     
    Port:Enter 443, unless you are using a non-standard port for SSL traffic.
     
    SSL certificate:In the drop-down list, select the friendly name of the certificate that you just installed.
    IIS 8 add site binding window
  5. When you are finished, click OK.
    IIS 8 site bindings window
  6. Now you need to install the root certificate on your SharePoint server.

Using SharePoint 2013 to Install the Root Certificate

  1. Log into the DigiCert® Management Console (your account).
  2. In the DigiCert® Management Console, under Order, click the order number for the SSL Certificate that you just installed.
  3. On the My Orders tab, click Download.
    digicert management console
  4. In the Download Certificate section, click the Download or Copy/Paste Individual Certificates link.
    digicert management console
  5. Next, click the ROOT CERTIFICATE icon.
    digicert management console
  6. In the Opening TrustedRoot.crt window, click Save File to save the file to your SharePoint server.
    Opening TrustedRoot.crt window
  7. Next, open SharePoint 2013 Central Administration.
    From the Start screen, type and click SharePoint 2013 Central Administration.
  8. In SharePoint 2013 Central Administration, in the menu on the left, click Security and then, under General Security, click Manage trust.
    sharepoint 2013 central administration
  9. On the Trust Relationships page, in the menu at the top of the page, click New.
  10. In the Establish Trust Relationship window, in the General Setting section, in the Name box, type the name that you want to give the SSL Certificate.
    sharepoint 2013 central administration
  11. In the Root Certificate for the trust relationship section, click Browse to browse for and select the root certificate (i.e. TrustedRoot.crt).
  12. In the Establish Trust Relationship window, click OK.
  13. If the certificate is installed successfully, it should be listed on the Trust Relationships page.
    sharepoint 2013 central administration

Test Your Installation

If your web site is publicly accessible, our DigiCert® SSL Installation Diagnostics Tool can help you diagnose common problems.

Troubleshooting

If you run into certificate errors, try repairing your certificate trust errors using DigiCert® Certificate Utility for Windows. If this does not fix the errors contact support.

Additional Information

IIS 8 and Windows Server 2012 have the Server Name Indication-SNI feature, which you can use to host multiple SSL sites and certificates on a Single IP Address based on Host Headers on your IIS 8 server.

SharePoint 2013 SSL Certificate configuration

In this article you will learn how to setup SSL in SharePoint 2013. In my next article I will show you how to setup an Extranet in SharePoint 2013. Corporations usually setup SSL for Extranet sites. There are three ways to setup SSL.

1.       One way is to use a commercial SSL certificate. There are many sites that sell SSL certificates. For learning purposes you can sign up for a trial version (30 days). This is what this article will focus on today.


2.       Second way is to use a self-signed certificate that  you create in IIS.


3.       Third way is to set up your server to issue a certificate. This is what you need if you have custom DNS entries. Of course, you can also use first option (using commercial certificate) if you have DNS entries. If you use self-signed certificate and you have DNS entries, you get an error. More on this in another article!
So, let’s start. In this article, I will show you how to use Verisign certificate. Verisign is one the most popular companies that issue SSL certificates. We will sign up for a trial version.

1.       Before you sign up on Verisign site, we first need to create a certificate request. This will be needed when  you sign up at Verisign.


2.       Open IIS 7.0 (Start > Administrative Tools > Internet Information Services (IIS) Manager).


3.       Click on the server name.


4.       In IIS section, double-click Server Certificates.


5.       On the right side, under Actions, click Create Certificate Request… link.


6.       Request Certificate form will open. Fill out the fields. Enter your site name or URL in the  Common Name field. Enter your company name or abbreviation in Organization and Organizational Unit fields. Enter City and State. Enter full state name, abbreviation is not accepted. Select Country/region and click Next.


7.       Keep the default values selected. Cryptographic service provider should have Microsoft RSA SChannel Cryptographic Provider selected. If it’s a test or development environment, you can keep Bit length set to 1024. If it’s a production environment and you are using a purchased SSL key, then select Bit length according to your needs. What kind of security is needed depends on what kind of site you have created and what kind of content it has. For confidential content or for government sites, you may want to select at least 2048 in Bit length. Remember, the greater the bit length, the stronger the security. However, a greater bit length may decrease performance.


8.       Browse to a folder that will store the request and give a name to the file, for example, sslrequest. Click Finish.

9.       Go to Verisign site and sign up for a trial version. Here is the direct link for the signup page:


Enter technical contact details and click Continue. On the next screen, you will be asked to enter CSR. Open the request file that you had created, copy it and paste it into the box on the site. Once you have signed up, you will get an email with the key.


10.   There will be three links in the email. Click the first link to download  and install the Test Root CA Certificate. On the download page, there are different browsers listed. Select the browser that you will use for your site testing. Remember if you know you audience will use different browsers then you need to perform this step for every browser that your audience will be using. Steps for Internet Explorer are listed next.


11.   Click the link Download Secure Site Trial Root Certificate link. From the box, copy the certificate and save it in a text file with a .cer extension.


12.   Open Internet Explorer.


13.   Go to Tools > Internet Options > Content > Certificates.


14.   Click Import…. A wizard will open. Click Next.


15.   Browse to the location of the recently stored .cer file (step 11 above).


16.   Select the certificate and click Open.

17.   Click Next.

18.   Select Automatically select the certificate store based on the type of the certificate. Click Ok.

19.   Click Next then Finish.

20.   When prompted and asked if you wish to add the following certificate to the root store, click Yes.

21.   Second step listed in the email confuses many people. Basically this step is not required for latest IIS server. Users using IIS 5.0 or Higher servers do not need to download the intermediate CA as it is included with the SSL certificate upon issuance if they selected in the purchase as server vendor: Microsoft IIS 5.0 or higher. If you are not sure about the selection you made when requesting SSL certificate, go ahead and install it. It will not harm anything. To install it, perform same steps as listed above (Steps 11 – 19). Be sure to click second link in your email instead of first when performing step 11.


22.   Just like the second step, third step in the email is equally confusing. Don’t follow those steps, follow the ones listed below to install the certificate without hassles.

23.   Copy the certificate from your email. It will be at the bottom of the email. Be careful when copying. Copy whole text including -----BEGIN CERTIFICATE----- and -----END CERTIFICATE----- and paste it into Notepad. There should be no white spaces or extra line breaks.  Save the file with .p7b extension. You can name the file as sslcert.p7b or whatever you prefer.


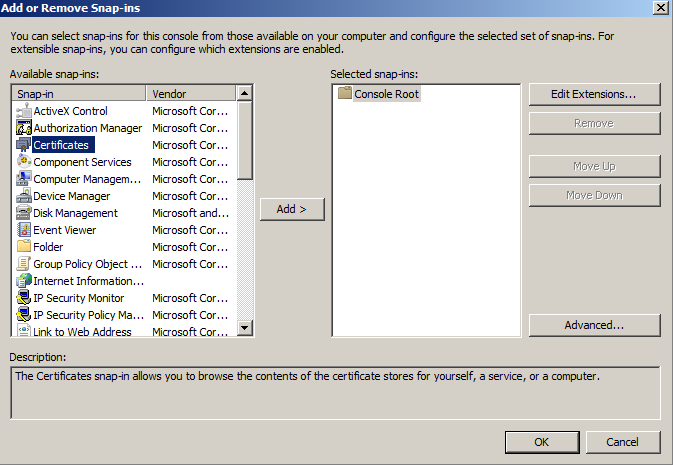
24.   Click Start > Run and type mmc and click OK. MMC console will open.


25.   From File, select Add/Remove Snap-in.


26.   Select Certificates from available snap-ins and click Add >.

27.   Select first option My user account and click Finish.

28.   Click OK.


29.   Expand Certificates – Current User node.


30.   Expand the Trusted Root Certification Authorities folder on the left and select the Certificates subfolder.


31.   Locate the following certificate:

a.       Issued To: VeriSign Class 3 Public Primary Certification Authority - G5

32.   Right-click the certificate and select Properties.

33.   In the Certificate purposes section, select Disable all purposes for this certificate. This is a pre-installed certificate and must be disabled before using new certificate from SSL.


34.   Click Apply then OK.


Install Certificate


35.   Finally, install the certificate. There are two ways to do it. One is through the IIS and the other is the MMC certificates console. I prefer the second way because you have to come to the MMC certificates console anyway to fix a problem if you opt to install the certificate through IIS. If you install the certificate through IIS, at the time of binding the certificate to your site, certificate will not show up in IIS and then you will have to come to the MMC certificates console to perform an additional step. So it’s better to go with the MMC route from the beginning.  There is another problem with the IIS method. You get the following error when you install the certificate through IIS.


Error Text: Cannot find the certificate request that is associated with this certificate file. A certificate request must be completed on the computer where the request was created.


36.   Open MMC console (Start > Run > Type MMC > Click OK).


37.   Certificates console will still be available because you added it in step 24 but if for some reason  you had to restart your machine or log out of it then you will have to add the console again. Follow steps 24 – 28 to add Certificates console. Expand Certificates – Current User node on the left.


38.   Expand Trusted Root Certification Authorities and click Certificates folder.


39.   Right-click Certificates folder and select All Tasks then select Import.


40.   Browse to the certificate (.p7b) file. Click Next.


41.   Select Place all certificates in the following store and leave default store selected. Click Next.


42.   Click Finish.


43.   You will get The import was successful message. Click Ok. You may also get following security warning.


Error Description: You are about to install a certificate from a certification authority (CA) claiming to represent: Verisign Trial Secure Server Root CA – G2.

If you get this security warning, click Yes to install the certificate.

44.   With MMC Certificates console still open, expand Personal folder on the left and right-click Certificates subfolder. Select All Tasks then select Import.


45.   Browse to certificate file (.p7b) and Click Next.


46.   Keep second option Place all certificates in the following store selected and keep Personal certificate selected as the default option. Click Next.


47.   Click Finish. You will get The import was successful message. Click Ok.

Bind Certificate to your site


48.   Finally, bind certificate to your site. Open IIS.


49.   Click server name. Expand Sites node.


50.   Click site name that you will bind to the SSL certificate.

51.   On the right, under Actions, click Bindings.


52.   Click Add.


53.   In Type, select https.


54.   Keep 443 in the Port. This is default port used for SSL.


55.   In SSL Certificate, select the certificate you just installed. Please note that if you don’t see new certificate in this drop down, then you probably missed steps 44 – 47 above. Click OK. That’s it.

Alternate Access Mappings


56.   Assuming you have a web application setup to work with SSL, configure Alternate Access Mappings to use site with SSL. Open Central Admin Site and click Application Management.


57.    Under Web Applications, click Configure alternate access mappings.


58.    You will notice you already have default site listed in the Default zone. To add new URL in the Intranet zone, click Add Internet URLs.


59.    From the Alternate Access Mapping Collection drop down, select correct application that you want to use for the AAM setting and then add URL in the text box labeled URL protocol, host and port, for example, https://www.walisystems.com. From the Zone dropdown, select Intranet.


60.    Click Save.

Now open site with https to test that everything works fine.


In the address bar, click the lock sign to check validity of the certificate. If you want to see the certificate, click View Certificates link at the bottom of the notification.

How to Create a Self Signed Certificate in IIS 7

SSL is an essential part of securing your IIS 7.0 site and creating a self-signed certificate in IIS 7 is much easier to do than in previous versions of IIS. SSL certificates enable the encryption of all traffic sent to and from your IIS web site, preventing others from viewing sensitive information. It uses public key cryptography to establish a secure connection. This means that anything encrypted with a public key (the SSL certificate) can only be decrypted with the private key and vice versa.

When to Use an IIS Self Signed Certificate

An SSL certificate has multiple purposes: distributing the public key and, when signed by a trusted third-party, verifying the identity of the server so clients know they aren’t sending their information (encrypted or not) to the wrong person. A self signed certificate is a certificate that is signed by itself rather than a trusted third party. This means you can't verify that you are connecting to the right server because any attacker can create a self signed certificate and launch a man-in-the-middle attack. Because of this, you should almost never use a self signed certificate on a public IIS server that requires anonymous visitors to connect to your site. However, self signed certificates can be appropriate in certain situations:

  • Self signed certificates can be used on an intranet. When clients only have to go through a local intranet to get to the server, there is virtually no chance of a man-in-the-middle attack.
  • Self signed certificates can be used on an IIS development server. There is no need to spend extra cash buying a trusted certificate when you are just developing or testing an application.
  • Self signed certificates can be used on personal sites with few visitors. If you have a small personal site that transfers non-critical information, there is very little incentive for someone to attack the connection.

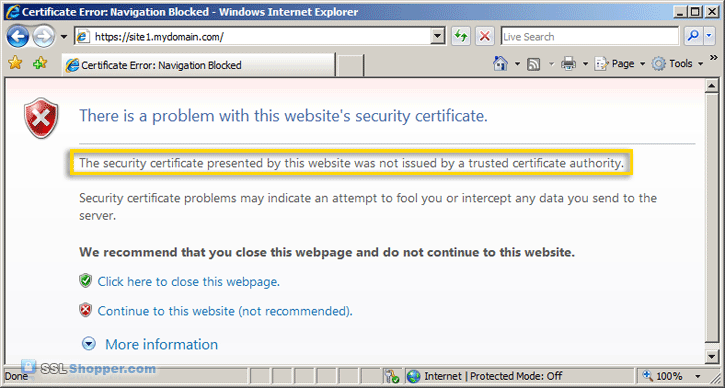
  • Just keep in mind that visitors will see a warning in their browsers (like the one below) when connecting to an IIS site that uses a self signed certificate until it is permanently stored in their certificate store. Never use a self signed certificate on an e-commerce site or any site that transfers valuable personal information like credit cards, social security numbers, etc.

    Apache Self signed Certificate Error in Firefox

    Generate Your IIS Self Signed Certificate

    Now you know when to use an IIS self signed certificate and when not to. Now let’s create one: (Click here to hide or show the images)
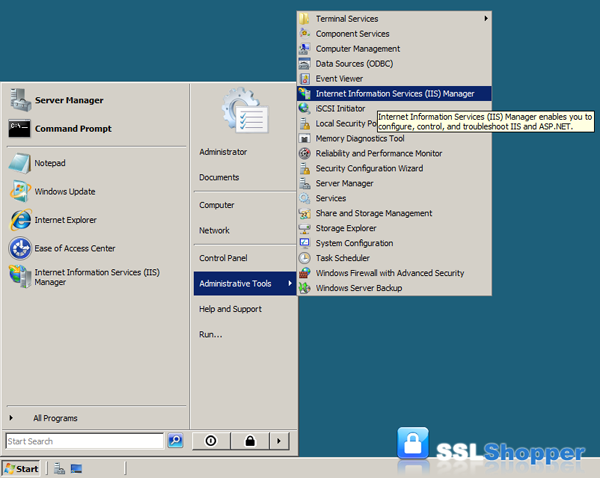
    1. Click on the Start menu, go to Administrative Tools, and click on Internet Information Services (IIS) Manager.
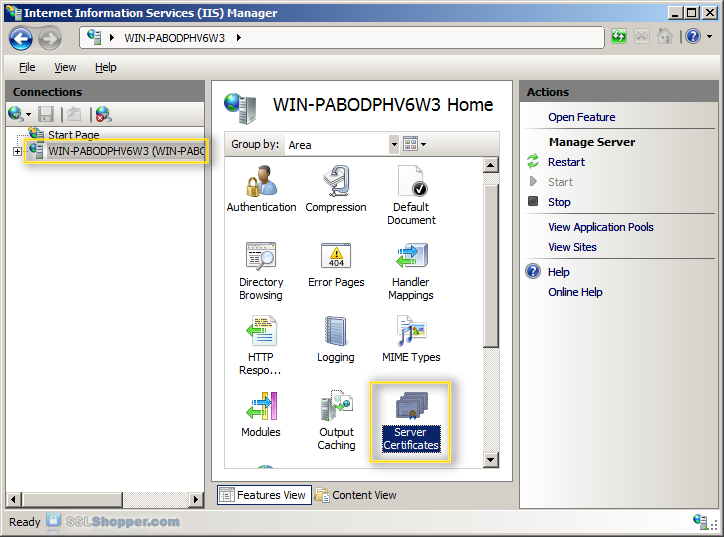
    2. Click on the name of the server in the Connections column on the left. Double-click on Server Certificates.
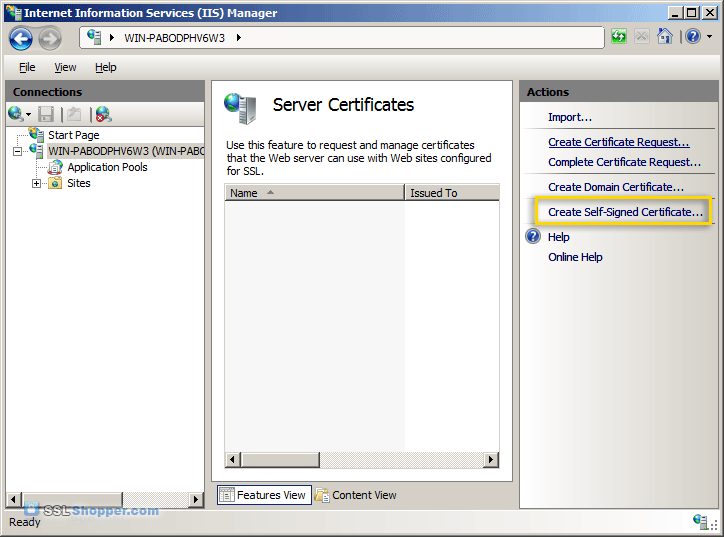
    3. In the Actions column on the right, click on Create Self-Signed Certificate...
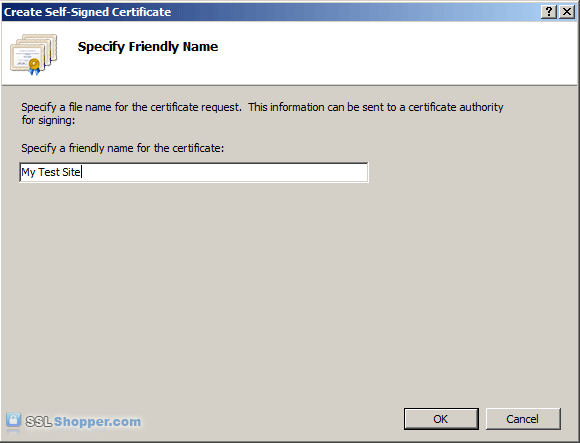
    4. Enter any friendly name and then click OK.
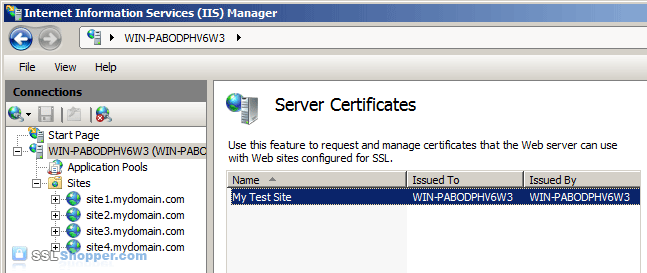
    5. You will now have an IIS Self Signed Certificate valid for 1 year listed under Server Certificates. The certificate common name (Issued To) is the server name. Now we just need to bind the Self signed certificate to the IIS site.

    Bind the Self Signed Certificate


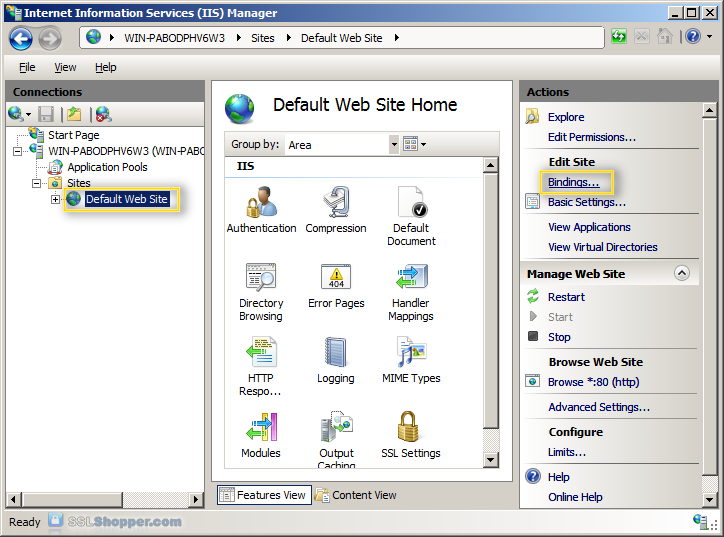
    1. In the Connections column on the left, expand the sites folder and click on the website that you want to bind the certificate to. Click on Bindings... in the right column.
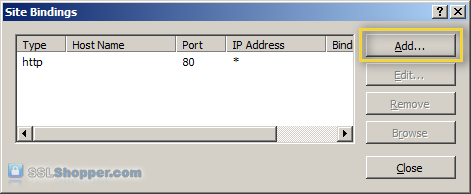
    2. Click on the Add... button.
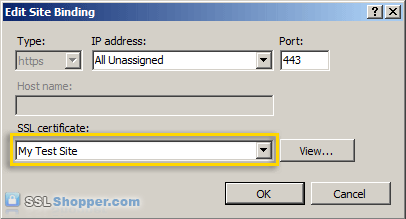
    3. Change the Type to https and then select the SSL certificate that you just installed. Click OK.
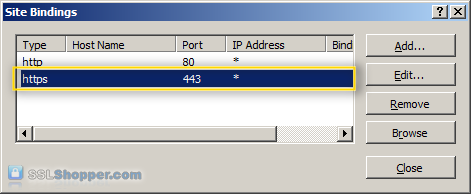
    4. You will now see the binding for port 443 listed. Click Close.
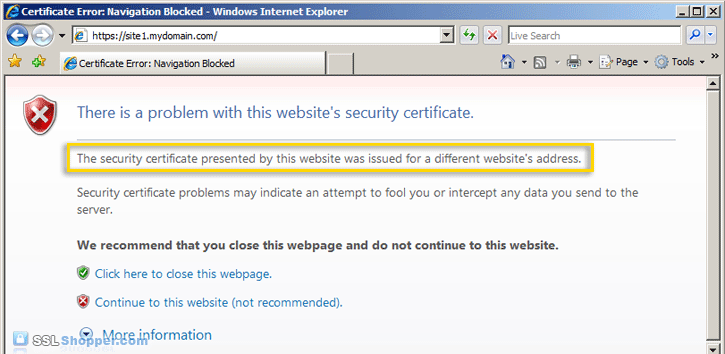
    5. Now let's test the IIS self signed certificate by going to the site with https in our browser (e.g. https://site1.mydomain.com). When you do, you should see the following warning stating that "The security certificate presented by this website was issued for a different website's address" (a name mismatch error).
      This is displayed because IIS always uses the server's name (in this case WIN-PABODPHV6W3) as the common name when it creates a self signed certificate. This typically doesn't match the hostname that you use to access the site in your browser (site1.mydomain.com). For many situations where IIS self signed certificates are used, this isn't a problem. Just click "Continue to this web site" each time. However, if you want to completely get rid of the error messages, you'll need to follow the next two steps below.

    Generate a Self Signed Certificate with the Correct Common Name

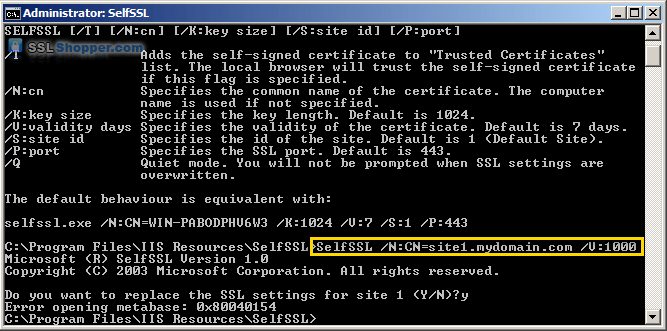
    This step is only required if you want to get rid of the warning message displayed because the common name on the self signed certificate doesn't match the website's hostname. In order to resolve this problem, we'll need to create the self signed certificate using the same method that is used to create a self signed certificate in IIS 6.0 (with SelfSSL instead of through IIS).
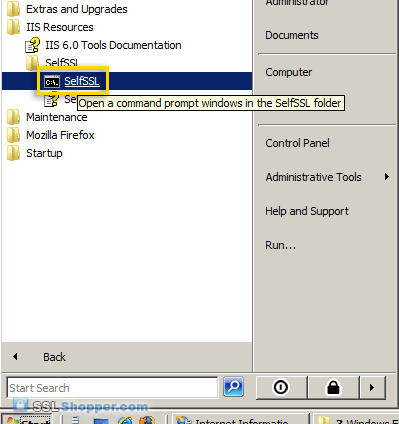
    1. Download the Internet Information Services (IIS) 6.0 Resource Kit Tools and install SelfSSL 1.0 (if you do a Custom install you can uncheck everything except for SelfSSL). Once it is installed, click on the Start menu, go to IIS Resources, then SelfSSL, and run SelfSSL.
    2. Paste in the following command and replace site1.mydomain.com with the hostname of your IIS site. If you receive the erorr "Error opening metabase: 0x80040154", just ignore it. We will be manually binding the certificate to the website.
      SelfSSL /N:CN=site1.mydomain.com /V:1000
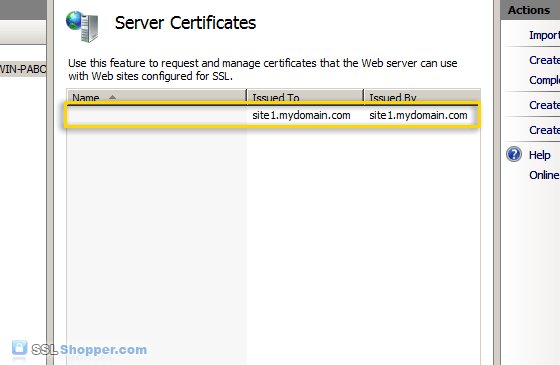
    3. After the command is finished, you will have an IIS self signed certificate with the correct common name listed in the Server Certificates section of IIS. Now follow the instructions above to bind the certificate to your IIS website.
    4. After you have bound the new certificate to your IIS site, visit it with https in your web browser and you will encounter another error: "The security certificate presented by this website was not issued by a trusted certificate authority." (the SSL Certificate Not Trusted error)
      Don't worry; this is the last error we will need to fix. This is a normal error for self signed certificates because the certificate is signed by itself instead of a trusted SSL provider. All visitors to the site will see that error unless they import the self-signed certificate into their Trusted Root Certification Authorities store (or the appropriate SSL certificate store for the browser they are using). You can easily add the IIS self signed certificate to the store on the server by following the the instructions below. If you need to import the certificate on another Windows machine, just follow the instructions on how to Move or copy an SSL certificate from a Windows server.

    Add the Self Signed Certificate to Trusted Root Certificate Authorities

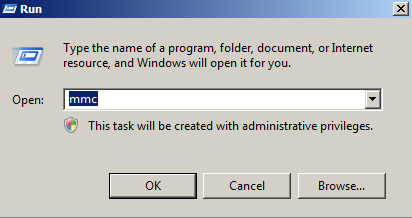
    1. Click on the Start menu and click Run.
    2. Type in mmc and click OK.
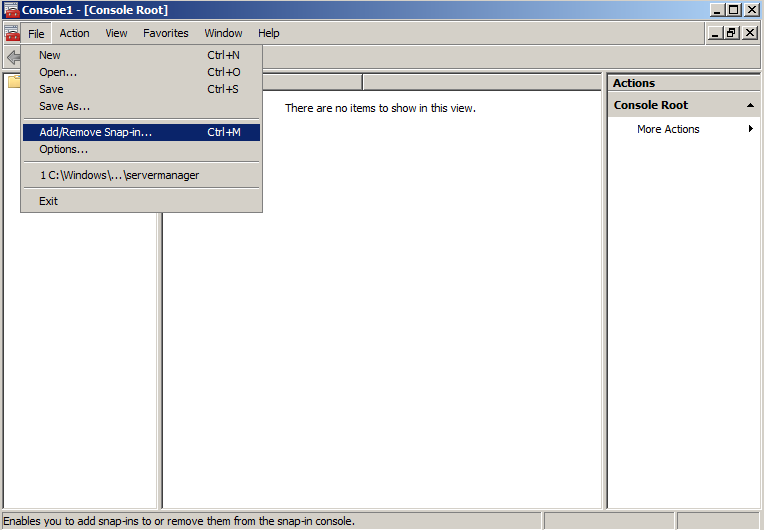
    3. Click on the File menu and click Add/Remove Snap-in...
    4. Double-click on Certificates.
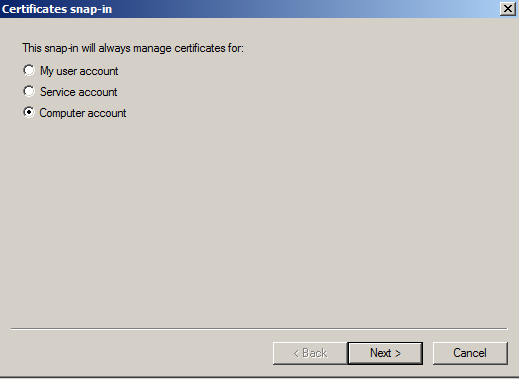
    5. Click on Computer Account and click Next.
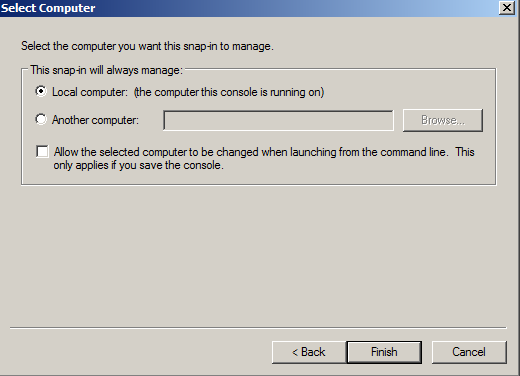
    6. Leave Local Computer selected and click Finish.
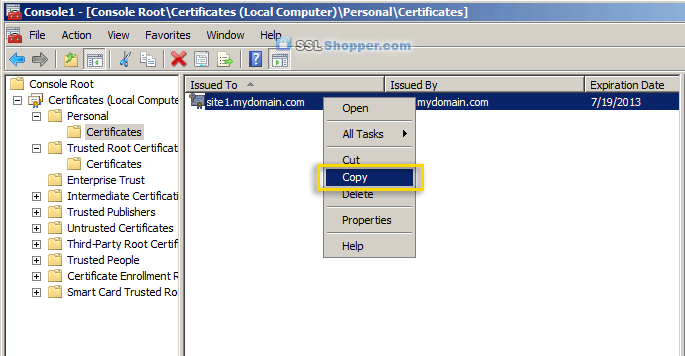
    7. Expand the Certificates item on the left and expand the Personal folder. Click on the Certificates folder and right-click on the self signed certificate that you just created and select Copy.
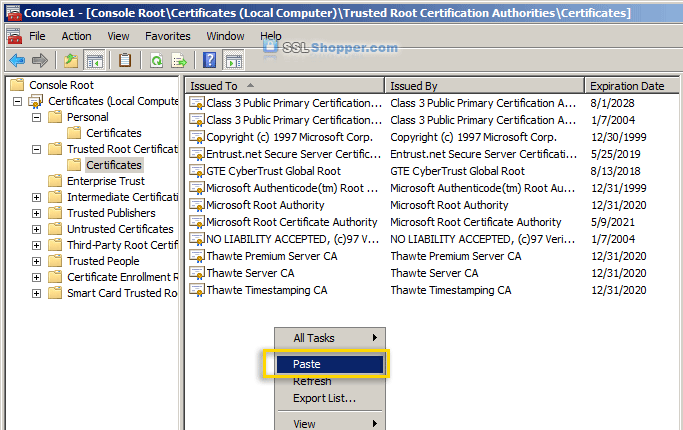
    8. Expand the Trusted Root Certification Authorities folder and click the Certificates folder underneath it. Right-click in the white area below the certificates and click Paste.
    9. Now you can visit your site with https in your web browser and you shouldn't receive any errors because Windows will now automatically trust your IIS self signed certificate.
    For more information on generating an IIS self signed certificate, see the following links: