Thursday, 18 June 2015

How to Create a Self Signed Certificate in IIS 7

SSL is an essential part of securing your IIS 7.0 site and creating a self-signed certificate in IIS 7 is much easier to do than in previous versions of IIS. SSL certificates enable the encryption of all traffic sent to and from your IIS web site, preventing others from viewing sensitive information. It uses public key cryptography to establish a secure connection. This means that anything encrypted with a public key (the SSL certificate) can only be decrypted with the private key and vice versa.

When to Use an IIS Self Signed Certificate

An SSL certificate has multiple purposes: distributing the public key and, when signed by a trusted third-party, verifying the identity of the server so clients know they aren’t sending their information (encrypted or not) to the wrong person. A self signed certificate is a certificate that is signed by itself rather than a trusted third party. This means you can't verify that you are connecting to the right server because any attacker can create a self signed certificate and launch a man-in-the-middle attack. Because of this, you should almost never use a self signed certificate on a public IIS server that requires anonymous visitors to connect to your site. However, self signed certificates can be appropriate in certain situations:

  • Self signed certificates can be used on an intranet. When clients only have to go through a local intranet to get to the server, there is virtually no chance of a man-in-the-middle attack.
  • Self signed certificates can be used on an IIS development server. There is no need to spend extra cash buying a trusted certificate when you are just developing or testing an application.
  • Self signed certificates can be used on personal sites with few visitors. If you have a small personal site that transfers non-critical information, there is very little incentive for someone to attack the connection.

  • Just keep in mind that visitors will see a warning in their browsers (like the one below) when connecting to an IIS site that uses a self signed certificate until it is permanently stored in their certificate store. Never use a self signed certificate on an e-commerce site or any site that transfers valuable personal information like credit cards, social security numbers, etc.
    Apache Self signed Certificate Error in Firefox

    Generate Your IIS Self Signed Certificate

    Now you know when to use an IIS self signed certificate and when not to. Now let’s create one: (Click here to hide or show the images)
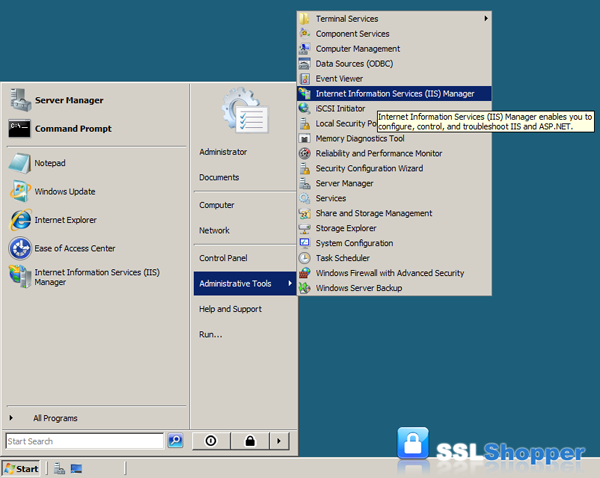
    1. Click on the Start menu, go to Administrative Tools, and click on Internet Information Services (IIS) Manager.
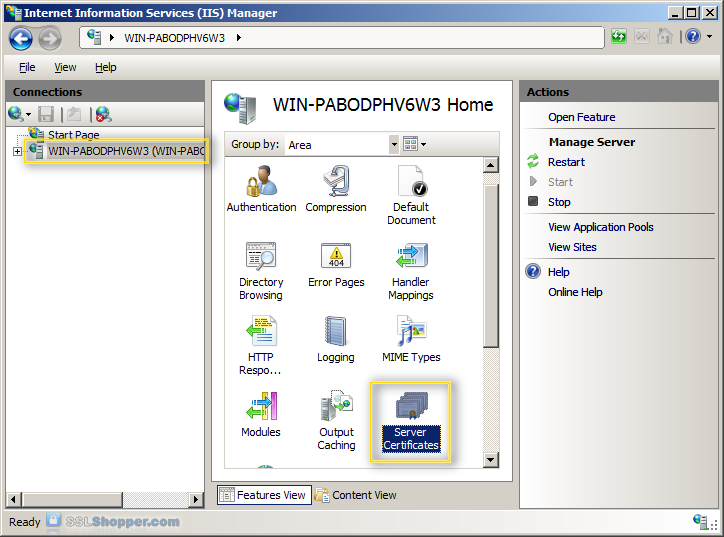
    2. Click on the name of the server in the Connections column on the left. Double-click on Server Certificates.
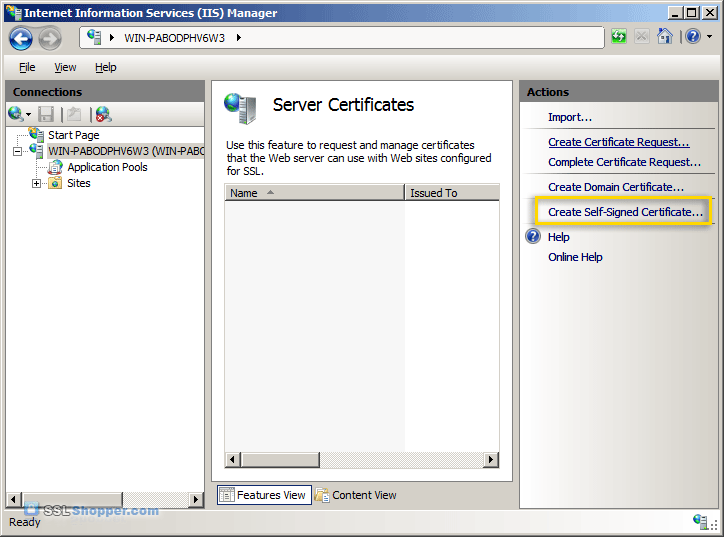
    3. In the Actions column on the right, click on Create Self-Signed Certificate...
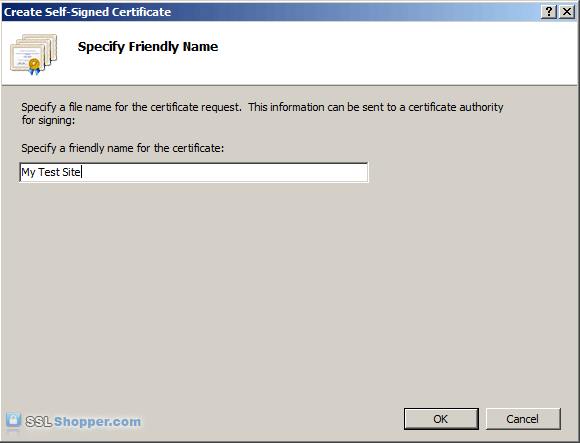
    4. Enter any friendly name and then click OK.
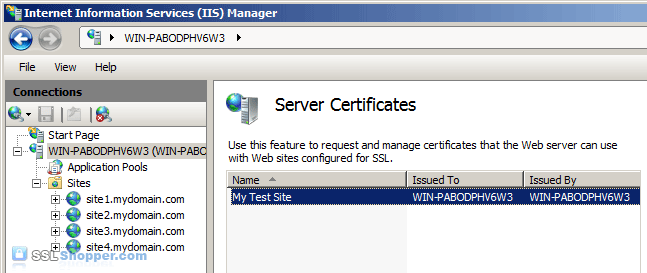
    5. You will now have an IIS Self Signed Certificate valid for 1 year listed under Server Certificates. The certificate common name (Issued To) is the server name. Now we just need to bind the Self signed certificate to the IIS site.
    Bind the Self Signed Certificate


    1. In the Connections column on the left, expand the sites folder and click on the website that you want to bind the certificate to. Click on Bindings... in the right column.
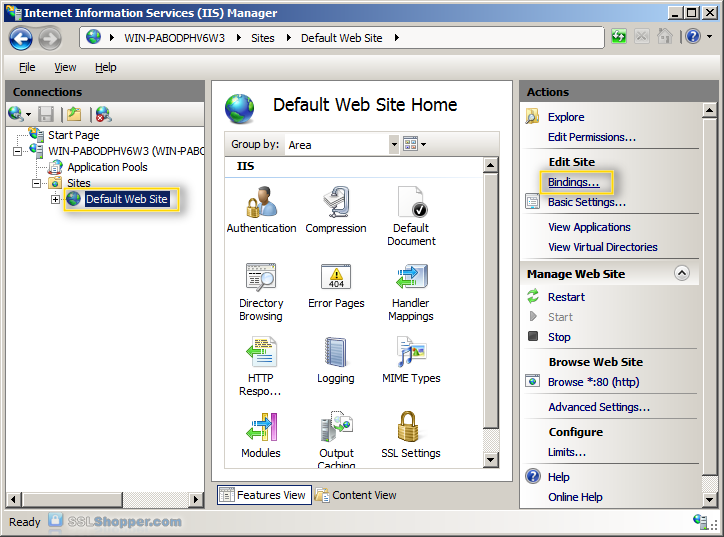
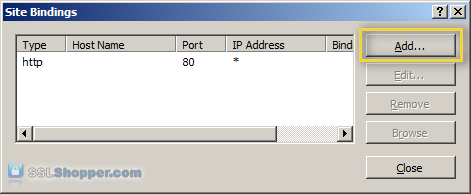
    2. Click on the Add... button.
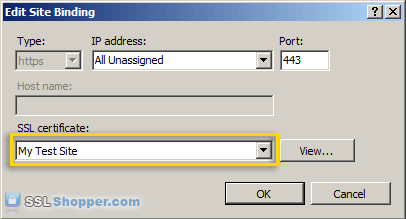
    3. Change the Type to https and then select the SSL certificate that you just installed. Click OK.
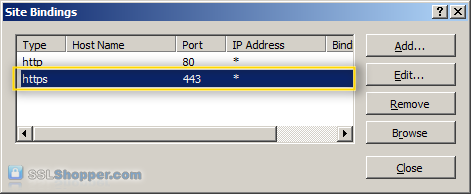
    4. You will now see the binding for port 443 listed. Click Close.
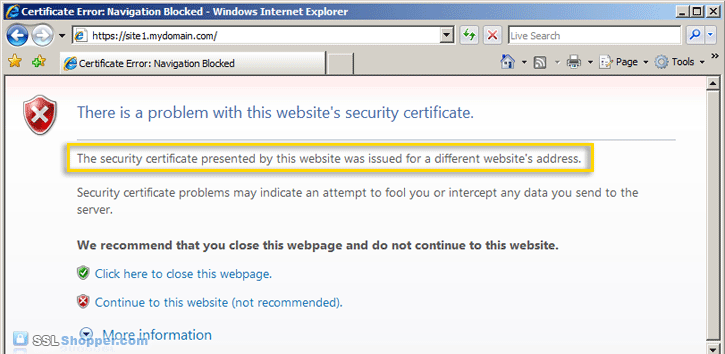
    5. Now let's test the IIS self signed certificate by going to the site with https in our browser (e.g. https://site1.mydomain.com). When you do, you should see the following warning stating that "The security certificate presented by this website was issued for a different website's address" (a name mismatch error).
      This is displayed because IIS always uses the server's name (in this case WIN-PABODPHV6W3) as the common name when it creates a self signed certificate. This typically doesn't match the hostname that you use to access the site in your browser (site1.mydomain.com). For many situations where IIS self signed certificates are used, this isn't a problem. Just click "Continue to this web site" each time. However, if you want to completely get rid of the error messages, you'll need to follow the next two steps below.
    Generate a Self Signed Certificate with the Correct Common Name

    This step is only required if you want to get rid of the warning message displayed because the common name on the self signed certificate doesn't match the website's hostname. In order to resolve this problem, we'll need to create the self signed certificate using the same method that is used to create a self signed certificate in IIS 6.0 (with SelfSSL instead of through IIS).
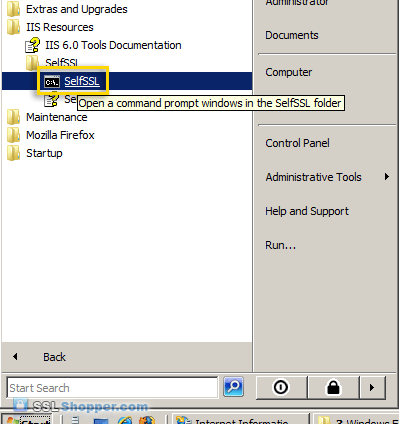
    1. Download the Internet Information Services (IIS) 6.0 Resource Kit Tools and install SelfSSL 1.0 (if you do a Custom install you can uncheck everything except for SelfSSL). Once it is installed, click on the Start menu, go to IIS Resources, then SelfSSL, and run SelfSSL.
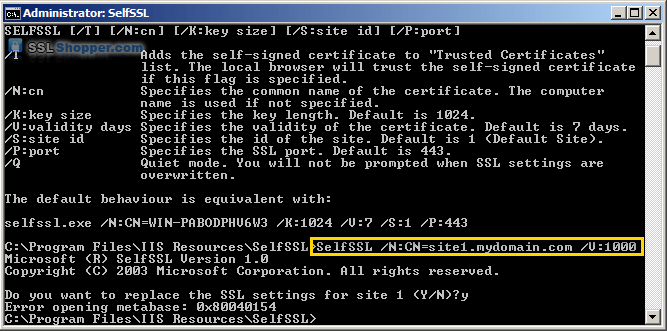
    2. Paste in the following command and replace site1.mydomain.com with the hostname of your IIS site. If you receive the erorr "Error opening metabase: 0x80040154", just ignore it. We will be manually binding the certificate to the website.
      SelfSSL /N:CN=site1.mydomain.com /V:1000
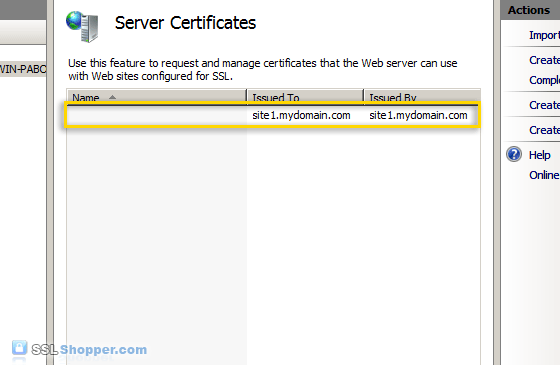
    3. After the command is finished, you will have an IIS self signed certificate with the correct common name listed in the Server Certificates section of IIS. Now follow the instructions above to bind the certificate to your IIS website.
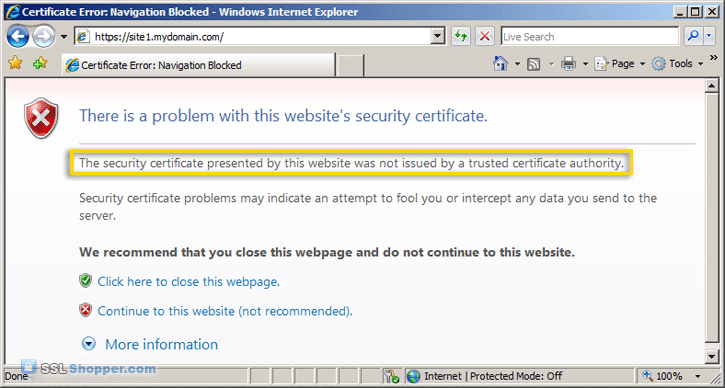
    4. After you have bound the new certificate to your IIS site, visit it with https in your web browser and you will encounter another error: "The security certificate presented by this website was not issued by a trusted certificate authority." (the SSL Certificate Not Trusted error)
      Don't worry; this is the last error we will need to fix. This is a normal error for self signed certificates because the certificate is signed by itself instead of a trusted SSL provider. All visitors to the site will see that error unless they import the self-signed certificate into their Trusted Root Certification Authorities store (or the appropriate SSL certificate store for the browser they are using). You can easily add the IIS self signed certificate to the store on the server by following the the instructions below. If you need to import the certificate on another Windows machine, just follow the instructions on how to Move or copy an SSL certificate from a Windows server.

    Add the Self Signed Certificate to Trusted Root Certificate Authorities

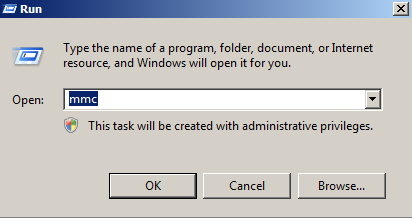
    1. Click on the Start menu and click Run.
    2. Type in mmc and click OK.
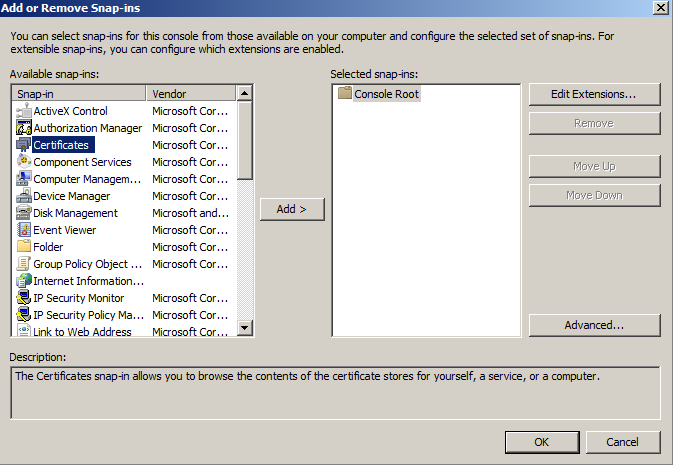
    3. Click on the File menu and click Add/Remove Snap-in...
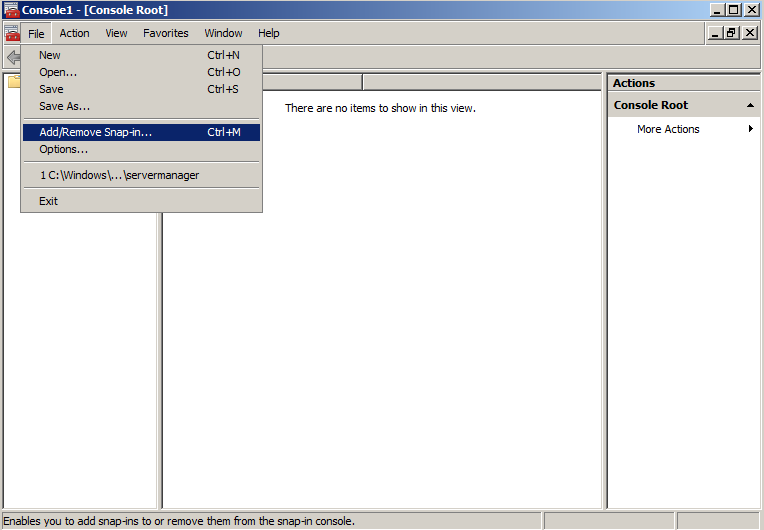
    4. Double-click on Certificates.
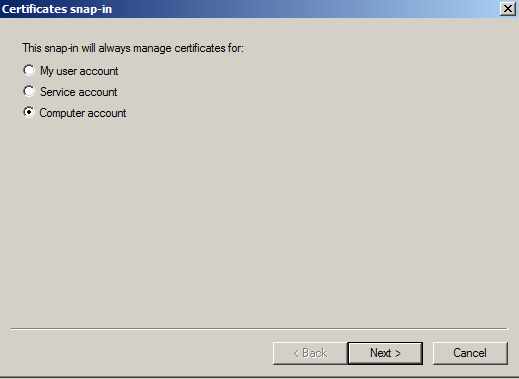
    5. Click on Computer Account and click Next.
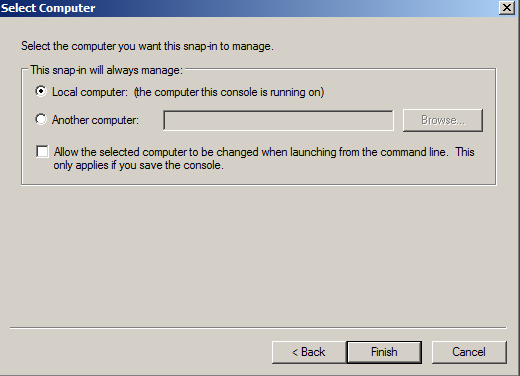
    6. Leave Local Computer selected and click Finish.
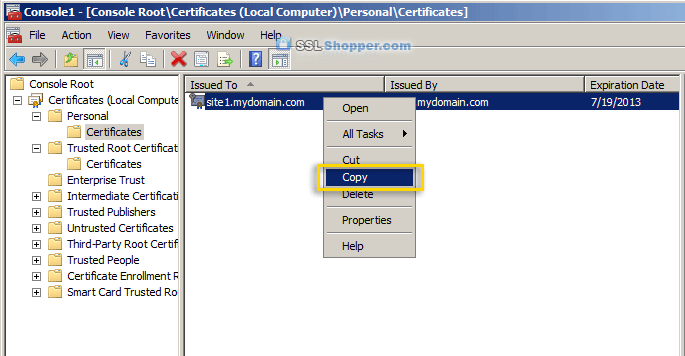
    7. Expand the Certificates item on the left and expand the Personal folder. Click on the Certificates folder and right-click on the self signed certificate that you just created and select Copy.
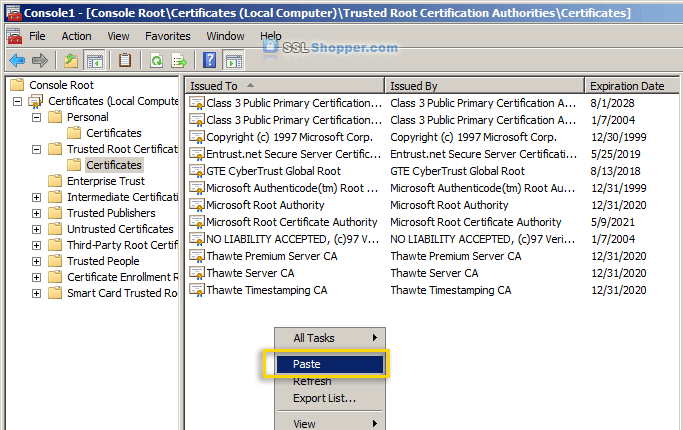
    8. Expand the Trusted Root Certification Authorities folder and click the Certificates folder underneath it. Right-click in the white area below the certificates and click Paste.
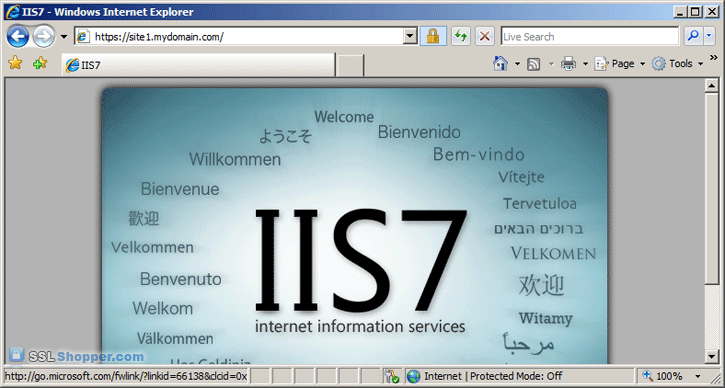
    9. Now you can visit your site with https in your web browser and you shouldn't receive any errors because Windows will now automatically trust your IIS self signed certificate.
    For more information on generating an IIS self signed certificate, see the following links:

    https and Secure Sockets Layer in SharePoint 2013

    Requirements for https in testing are these:

    – They should look and behave the same as it would in production
    – It should be a real DNS URL or a real URL added to the host file
    – It should not cause any red warnings in the browser
    – IIS and SharePoint must be configured the same way as if it were a real life scenario
    How do we do this? Let me show you how I would do it…
    First we need a proper environment, in my setup I have:
    – A single SharePoint 2013 server on Windows Server 2012 running all roles but the DB.
    – A SQL server 2008 R2 on Windows Server 2008 R2 (OS here is irrelevant)
    – A Windows Server 2012 DNS server
    – A Windows Server 2012 Domain Controller (Any DC will do…)
    – A Windows 7 client with Internet Explorer 9. (Most common customer setup, works from the server as well with loopback check disabled)
    I am also using a utility from the IIS 6.0 Resource kit, download that before we start from this link: Download IIS 6.0 Resource Kit
    In order for https / SSL and SharePoint to work we need a few things, lets add it all up in a checklist:
    – A Web Application with a root site already created
    – A URL (FQDN preferred)
    – A DNS entry to go with the URL
    – A Self-signed Certificate (or from a trusted issuer)
    – AAM
    – IIS Binding
    – Certificate added to trusted authority on the client/server
    – URL added to the local intranet zone in Internet Explorer for auto-logon


    In my example, I will use the following:
    RequirementIn my test environment
    – A URL (FQDN preferred)sharepoint2013.corp.balkestahl.se
    – A DNS entry to go with the URLsharepoint2013.corp.balkestahl.se -> 192.168.1.130
    – A Certificate (Self signed or from a trusted issuer)Certificate created using the IIS 6.0 RK utility SelfSSL.
    – AAMInternal http and https, Public https only
    – IIS BindingBind my site to https and all IP using the created certificate

    –
    –
    These are the steps we need to take (click on any link):
    1. Create a new Web Application or use an existing one (use port 80 initially and not https/443 for this guide.)
    2. DNS, create an A-Record
    3. Create the certificate (or request, buy, get any way you choose the real deal)
    4. Add IIS Binding with Host-Header (this has to be done manually)
    5. AAM, Add the necessary Alternate Access Mappings
    6. Add the certificate to the Trusted Certificate store on the client
    7. Test functionality
    8. T-Shooting
    9. References and recognitions
    Note: If there is something that I have missed in this guide, or that should be done differently, please let me know.
    I will reply to any comment and feedback that you submit.
     –
    –
    1. Web Application
    This step can be skipped completely if you already have a working Web Application with http on port 80 with an existing Site Collection.
    If you do not have that or don’t feel Confident that it will be adequate, follow these simple steps.
    1.1 In Central Admin, go to Application Management, then Manage Web Applications, in the ribbon, click on new, fill in the form using your own values.
    Note: The Name value is what the Web Application will be shown as in CA and in IIS.
     
    NewWebApp1x

    1.2 Note that I have not chosen to use SSL here, this will be added at a later time. Leave these choices as default.

    NewWebApp2x

    1.3 The http url for this web application. As we set this up initially on port 80 and using http only, this could be anything, I have chosen to use the same FQDN as my https address will use.

    NewWebApp3x

    Leave all other settings as is, the default values will do just fine for this test. The default is in 2013 using claims as authentication provider and this will serve our goal well.
    I will not show you step by step how to create a Site Collection in the Web Application, something that you must do in order for the browser to later access the URL. But the steps are something like this:
    1.4 Create a new Site Collection: In Central Admin select Application Management
    1.5 Under Site Collections section, click on Create Site Collection.
    1.6 In the dropdown, select the proper Web Application.
    1.7 Enter a Name, Address and Description.
    1.8 If only for test, use the Team site template under the Collaboration tab.
    1.9 Add yourself as a site Collection administrator, or the account that will test access from a client, or add both in the primary and secondary fields.
    1.10 Click OK. Wait until it has been created. Done!
     –
    –
    2. DNS
    2.1 On your Windows Server 2012 running the DNS service, start server manager, then click on Tools and select DNS:

    DNS1x

    2.2 Locate the forward lookup zone for your domain:

    DNS2x

    2.3 Right click the zone and select New Host (A or AAAA)…

    DNS3x

    2.4 Enter the name of your site, this together with the full domain path will form the FQDN, Fully Qualified Domain Name. In the IP address field you enter the IP address of the SharePoint web server:

    DNS4x

    2.5 Click on Add Host and then Done, when you see this and verify that the FQDN shown is correct, you are done with the DNS part.

    DNS5x
     –
    –
    3. Create a certificate

    In my test setup, I will create my own certificate but use a properly named one, this makes it feel more like the real thing. If you have not already done so, download and install the IIS 6.0 Resource kit that comes with the nifty little util called SelfSLL. This allows you to create a self-signed certificate that has a proper URL, a requirement if you want to avoid the red warning in the browser that a regular self-signed cert would give you. The RK can be downloaded here: Download IIS 6.0 Resource Kit
    Content of the IIS 6.0 Resource Kit – the following tools are available in this package:
    • IIS 6.0 Migration Tool Version 1.0 Version 1.1 Now Available!
    • Apache to IIS 6.0 Migration Tool Version 1.0
    • CustomAuth Version 1.0
    • IISCertDeploy.vbs Version 1.0
    • IIS Host Helper Service Version 1.0
    • IISState Version 3.0
    • Log Parser Version 2.1 Version 2.2 Now Available!
    • Metabase Explorer Version 1.6
    • Permissions Verifier Version 1.0
    • RemapUrl Version 1.0
    • SelfSSL Version 1.0
    • TinyGet Version 5.2
    • Web Capacity Analysis Tool Version 5.2
    • WFetch Version 1.3
    What we really want out of all this this time, is the small util called SelfSSL in bold. This little util allows you like I said before, to create a self-signed cert using an FQDN of choice. In my example, I want to use the URL: sharepoint2013.corp.balkestahl.se and have the cert created with the same URL. I’ll show you how step by step.
    It’s really quite simple.
    Note: You might consider even in a lab Environment, to install your own Certificate Authority and issue your own private Certificates, the following links will be of help when doing that:
    Install the Certification Authority (Windows Server 2012)
    Install a Root Certification Authority (Windows Server 2008 R2)
    Active Directory Certificate Services Overview (Windows Server 2012) 
    3.1 Run the tool from the start menu:

    https2x

    3.2 The command-line tool does not look much to the world:

    https3

    Note: You need to be logged on with an account that is a member of the local administrators Group in order to use this tool.
    It gives you some options and I’m not going to go into what can be done with this tool, I’ll just go with the default and create a certificate using the suggested settings with one exception, we need to use the proper site ID.
    Every site in IIS gets an ID, this is in this case used to put the certificate in the correct place on the correct site.
    3.3 Get the correct ID from IIS, open up the IIS Manager, in server manager, click on Tools and then on Internet Information Services Manager:

    SiteID01x

    3.4 In Internet Information Services Manager, select your site:

    SiteID1x

    3.5 On the right pane, near the bottom, click on Advanced Settings…:

    SiteID2x

    3.6 In the next dialog, you will see a row called simply ID:

    SiteID3x

    3.7 Select the number in the field and right click and copy:

    SiteID4x

    3.8 Paste the ID after the /S: switch. You should also change the value for the /V: setting, this represents how many days the certificate will be valid, the default 7 is ok for me in a very temporary setup, but for longer test runs, make it 90 Days or so. If the certificate expires, you will get ugly warnings that the certificate has expired and that it is untrusted. Https wil still work but on probation…
    Now you have all you need to proceed. Run the SelfSSL util and use the site ID but leave everything else default.
    Answer yes to the question – Do you want to replace the SSL settings for site 724410038.
    selfssl.exe /N:CN=SharePoint2013.corp.balkestahl.se /K:1024 /V:7 /S:724410038 /P:443

    https51x

    Note: One option that could be useful, if you add the /T to the command the certificate will be added to the local Machines trusted authority certificates list. This makes it trusted in the servers browser.
    The certificate is now created and put into the personal store for this computer.
    If you get an error here stating that the certificate could not be assigned to the site, then you most likely already have an instance of the same certificate name, locate any existence of the certificate and delete it. (See how later in the post under chapter 8. T-shooting)
    Move on to Chapter 4 or go
     –
    –
    4. IIS Binding
    In order for the web server, IIS, to recognize any incoming traffic and locate the proper site to direct it to, IIS uses Host header bindings. This is done so that you can have more than one site on port 80 in the same web server. The default site has a blank Host header binding which will in affect make it claim all incoming requests as its own.
    SharePoint stops the Default Web Site so that does not affect us now, but we need to take care of our own IIS Web Site that in reality is our SharePoint Web Application.
    What we have to do, is make our IIS Web Site answer to all incoming traffic with a host header of https and the FQDN created in Chapter 2. DNS – sharepoint2013.corp.balkestahl.se
    4.1 Start by opening up your IIS manager, in Server Manager, click on tools and the on Internet Information Services (IIS) Manager:

    SiteID01x

    4.2 Locate your Web Site:

    SiteID1x

    4.3 In the right hand pane, locate Bindings:

    SIteID21x

    4.4 What you see here is a list of the existing Bindings for this site, Type, Host Name, Port and IP address. If you have created the certificate using the SelfSSL util and added the ID of the Web Site, then you will most likely see at least two rows here (see 4.5).

    https6x

    4.5 This is what you will have if the SelfSSL successfully added the cert to the site using its ID:
    If this is what you have, select the second row with the https/443 and click on Edit, then scroll down to step 4.11 in this guide.

    https61x

    4.6 Assuming that it was not added, we have to add the cert to the site. Click on Add.

    https7

    4.7 In this dialog, we must first select the proper protocol, https. Use the dropdown:

    https8

    4.8 Once you have selected https as the protocol, you will find that a new field appears. This is where you select the certificate to use.

    https9x

    4.9 Select the certificate created in Chapter 3. Create a Certificate, in my environment, that is the sharepoint2013.corp.balkestahl.se certificate listed.
    4.10 Once selected, you can click on View to verify that it really is the correct certificate and that everything looks to be in order, click on OK.

    https10

    4.11 Next we add the Host Name that this Binding will be matched on, same as the certificate name, sharepoint2013.corp.balkestahl.se, click OK.

    https11x

    4.12 Now you should see two rows in the bindings list for this Web Site. One for the initial http/80 and one for https/443. This is goOoOod!

    https12x

    4.13 Now click on Close and Close the IIS manager.
    Move on to Chapter 5 or go  –
    –
    5. Alternate Access Mappings – AAM
    In order for SharePoint to know how to handle the incoming requests for this new URL, we need to add/configure Alternate Access Mappings, this basically tells SharePoint how to handle all URLs. AAMs Control if SharePoint should do a redirect or a translation of the incoming address. AAMs can be configured from Central Administration and using PowerShell, I will in this guide use only CA.
    5.1 Open up your Central Administration site and click on Configure Alternate Access Mappings located under the System Settings category.
    This will show you all Alternate Access Mappings for all of your Web Applications in the farm. In the top right dropdown, click on Change Alternate Access Mapping Collection and select the correct Web Application.
    Now, it will look like this:
    –
    httpsAAM1x

    5.2 Next thing we want to do, is to alter the existing Public URL so that it uses https instead of http. Since all else is ok, add the s…

    httpsAAM2x

    5.3 Ok on that will give you this view, note that both the Internal URL and the Public URL has changed. This site is now only accessible by the https protocol. (Not entirely true, but true enough)

    httpsAAM3x

    5.4 I always like to be able to type in the default http URL in my browser, and if the site uses https, be redirected automatically. This is rather easy to do in SharePoint, simply add an Internal URL using http and add it to the Default zone which will direct us to the Public URL using https. It may sound difficult but trust me, it just works.
    If you are interested in Learning more about Alternate Access Mappings and the inner workings, I have a free whitePaper published on the subject for 2010 Here and a basic post for 2013 Here.

    Anyways, click on the Add Internal URLs link and simply add the same URL using http, make sure that the default zone is selected.
    –
    Note: The zones used in AAM has NO RELATION with the zones in Internet Explorer, they are named similar, but they have no connection whatsoever.
     
    httpsAAM4x

    5.5 Now the list should look like this, note that you have http and https on the left (incoming traffic) and only https on the right (target):

    httpsAAM5x

    You are now done configuring your Alternate Access Mappings! Let’s move on to testing, start with Chapter 6.

     –
    6. Add the Certificate to the Trusted Authorities store.
    If we do nothing else from here, we will be able to access the site using https, but it will not be pretty…in order to mimic https using a ‘real’ certificate we need to also add the certificate to the trusted store. This will make the browser trust the cert as authentic and it will stop throwing us the errors.
    Note: If you are doing these tests on the server itself, you will need to disable the loopback check Before accessing the site, else it will fail. See Chapter 8. T-shooting for information on how to do this.
    6.1 Try it first, open a browser, type in the address of the https URL and hit enter. You will first see this warning. Click on Continue to this website.

    httpsTest61x

    6.2 This will lead to a login prompt. This is to be expected at this Point, login using your credentials that you have made site Collection admin or that have access to the site Collection.

    httpsTest62

    6.3 Access! Yeay! or…no…hang on?! that’s not the way I pictured it…we don’t have access and we have a red certificate error. This is not what we want our users to see…
    Two things cause this:
    6.3.1. The White ribbon telling us that this is a secured browser comes from that the server in this case, has IE ESC – Internet Explorer Enhanced Security Configuration enabled.
    If you are using a client like Windows 7 or 8, you will not see this but should actually see the site content.
    To fix this, follow the steps in this blog post: How to disable IE Enhanced Security in Windows Server 2012 (Opens up in a new window)
    6.3.2. The red Certificate error is there because the certificate comes from an untrusted source. This is as it should be, and can be fixed.
    To fix this, keep reading…

    httpsTest63

    6.4 There are several ways to add the certificate to the trusted store, I will show you the easiest of them all. Click on the Certificate Error to the right of the red shield symbol. This will show this:

    httpsTest65

    6.5 It is all true what it says, except that nobody is trying to fool us…Click on View Certificates to show this dialog:

    httpsTest66x

    6.6 You can probably guess what the next step is going to be? Click on Install Certificate…

    httpsTest67x

    6.7 We want the certificate to be in the Computers store, select Local Machine and click Next.

    httpsTest68x

    6.8 Select Place all Certificates in the following store and hit the Browse button.

    httpsTest681x

    6.9 Now, locate the ‘Trusted Root Certification Authorities’ and make sure it is selected, click OK.

    httpsTest682x

    6.10 Verify that this is what you see as well. Click on OK.

    httpsTest683

    6.11 Success! Try again to browse to the site, you should probably close the browser and start a new browser window.

    httpsTest684x

    6.12 Now we’re talking! that’s more like it, no red errors, no banner preventing us from loading the content…all is good, Life is GOOD!
    Note: On my own server, it simply took a while for the error to go away, the IE cache has a renewal cycle of 50 minutes, to force a renewal, press Ctrl F5. That should do it.
    –
    –
    7. Test functionality
    Testing has really already been taken care of in Chapter 6, but if you did what I did and used the servers browser (not recommended in production) to test access, then you really should test from a client to get the proper feel for it.
    Use the steps described in Chapter 6 on the client computer as well. The dialog may look a bit of, but it’s the same steps basically. Sample dialog:

    httpsTest4

    You will get the Picture if you use the steps in Chapter 6. Once you see the image below in your browser, you are OK!

    httpsTest684x

     –
    8. T-shooting
    T-shooting scenarios covered so far:
    – 8.1 Delete redundant certificates
    – 8.2 Configure Loopback check
    8.1 Delete redundant certificates
    If adding the cert fail and you want to delete every copy, do this:
    8.1.1 Press the start button, type Certificates…

    https92x

    8.1.2 Select Manage computer certificates.

    https93x

    8.1.3 This will open up the ‘Certificates Manager’//MMC Certificates Snap in. Locate the Personal, Certificates folder. In the content, either delete them both, or, find out which is the newer and delete the old one.

    https94x

    8.1.4 In the Certificate Details, you will see the Valid from timestamp, this is from when the certificate was created.

    https95x

    8.1.5 When you know which one to keep, delete the other, right click delete.
    Done.
    8.2 Configure Loopback check.
    Note: Remember that the loopback check is a security feature that has been put there for a reason, it protects the server from a certain form of attacks. Disabling it will open up the server for such attacks. Read Spencer Harbars post at the link below for a deeper understanding of this concept.
    Are you planning to do one of two things on your SharePoint server, then you need to configure this, configure, not necessarily disable it.
    – If you have search on the server and the Content source Points to the server itself using an FQDN.
    – If you want to use the servers browser to test functionality or to access CA using an FQDN. (This is us in this guide…)
    Note: I strongly recommend against using any browser on any server! It is a security risk since use of the browser opens up new ways for unwanted code to enter the server. Always access the server from a client browser!
    I use the servers browser in my lab to make it easier, but it is a contained lab environment and the accounts used do not have access to anything outside this particular lab environment. furthermore, the lab environment cannot be reached from outside nor can it access the Internet.
    (Thanks Anders Janson, UAG/TMG/Security expert at Enfo Zipper for great feedback!)
    Two links will tell you all you need to know:

    8.2.1 DisableLoopbackCheck & SharePoint: What every admin and developer should know. (Spencer Harbar explains it all)

    8.2.2 http://support.microsoft.com/kb/896861 (the best KB out there, it is old but still relevant)
    Done
    –
    –
    9. Resources and Recognitions
    Don’t know who the author is, but this article gave me the last piece in the https puzzle.

    Tuesday, 9 October 2012

    Missing SharePoint Server Enterprise Site Collection Features


    I've been in some rather deep discussions on Enterprise features, so I thought I would share some findings on what they are, where they are, and what they do.

    First, there are three different Enterprise features that can be enabled within a farm. They are:

    -Office SharePoint Server Enterprise Web application features
    -Office SharePoint Server Enterprise Site Collection features
    -Office SharePoint Server Enterprise Site features

    Unlike most of SharePoint, these features are not hierarchical in nature (per se). For instance, if you enable theEnterprise Web application features "feature", this does not mean that KPI lists will be available for all sites within that web application. Likewise, enabling Enterprise Site Collection features "feature" will not install the Slide Library list template for all webs under your site collection.

    So what DO the features do?

    First a small plug for using PowerShell to help manage your SharePoint environments. If you need a good place to start, check out my post on  (PSP4SP) for a starter script with common SharePoint functions. I used this script to generate the information within this post.

    Ok, on to Enterprise Features:

    Office SharePoint Server Enterprise Web application features

    Internal Feature Name: PremiumWebApplication
    Feature Id: 0EA1C3B6-6AC0-44aa-9F3F-05E8DBE6D70B


    Feature Definition Id Feature Display Name
    14173c38-5e2d-4887-8134-60f9df889bad PageConverters
    1dbf6063-d809-45ea-9203-d3ba4a64f86d SearchAndProcess
    d992aeca-3802-483a-ab40-6c9376300b61 BulkWorkflowTimerJob


    E15ED6D2-4AF1-4361-89D3-2ACF8CD485DE ExcelServerWebApplication


    Office SharePoint Server Enterprise Site Collection features

    Internal Feature Name: PremiumSite
    Feature Id: 8581A8A7-CF16-4770-AC54-260265DDB0B2


    Feature Definition Id Feature Display Name


    E978B1A6-8DE7-49d0-8600-09A250354E14 LocalSiteDirectorySettingsLink (adds a link to Site Directory in Site Settings)
    14AAFD3A-FCB9-4bb7-9AD7-D8E36B663BBD LocalSiteDirectoryControl (registers a control: ~/_controltemplates/CreateSitePanel1.ascx)


    5F3B0127-2F1D-4cfd-8DD2-85AD1FB00BFC PortalLayouts


    2ED1C45E-A73B-4779-AE81-1524E4DE467A WebPartAdderGroups


    C88C4FF1-DBF5-4649-AD9F-C6C426EBCBF5

    IPFSSiteFeatures (InfoPath Forms Services - Fields, CTypes, and CustomAction menu items)


    4248E21F-A816-4c88-8CAB-79D82201DA7B

    BizAppsSiteTemplates (Web Parts)


    FilterActions.dwp


    AuthoredListFilter.webpart
    BusinessDataActionsWebPart.dwp
    BusinessDataAssociationWebPart.webpart
    BusinessDataDetailsWebPart.webpart
    BusinessDataFilter.dwp
    BusinessDataItemBuilder.dwp
    BusinessDataListWebPart.webpart
    DateFilter.dwp
    IndicatorWebPart.dwp
    IViewWebPart.dwp
    KpiListWebPart.dwp
    OlapFilter.dwp
    PageContextFilter.webpart
    QueryStringFilter.webpart
    SpListFilter.dwp
    TextFilter.dwp
    UserContextFilter.webpart
    WSRPConsumerWebPart.dwp

    43F41342-1A37-4372-8CA0-B44D881E4434 BizAppsCTypes (Content Types for KPI List and Report Center)
    5A979115-6B71-45a5-9881-CDC872051A69 BizAppsFields (Fields for KPI List and Report Center)
    3CB475E7-4E87-45Eb-A1F3-DB96AD7CF313 ExcelServerSite

    Office SharePoint Server Enterprise Site features

    Internal Feature Name: PremiumWeb
    Feature Id: 0806D127-06E6-447a-980E-2E90B03101B8

    Feature Definition Id Feature Display Name
    E8734BB6-BE8E-48A1-B036-5A40FF0B8A81 RelatedLinksScopeSettingsLink
    56DD7FE7-A155-4283-B5E6-6147560601EE AnalyticsLinks
    0BE49FE9-9BC9-409d-ABF9-702753BD878D SlideLibrary
    065C78BE-5231-477e-A972-14177CC5B3C7 BizAppsListTemplates (KPI List)
    2510D73F-7109-4ccc-8A1C-314894DEEB3A ReportListTemplate
    00BFEA71-DBD7-4F72-B8CB-DA7AC0440130 DataConnectionLibrary


    IMPORTANT: Keep in mind that by enabling any one of these features requires that users have an enterprise client access license (ECAL). An argument has been made whether or not users are actually "using" the enterprise feature. Unofficially, for an "audit", an ACL list controlled area where enterprise features are enabled is a good practice. Control who can/cannot access your site or web application using permissions. Also see: Web Application Policies to deny users who only have a Standard-CAL.

    For mixed environments (standard and enterprise in same farm)...another issue that has come up is around governance. This is one area where the solution cannot be 100% technical...you MUST implement a process into your environment to control who will have access.

    In summary, there are 4 major "features" that require enterprise functionality Excel Services, InfoPath Forms Server, Business Data (BDC), and BI tools/web parts. With the first three, it is easy. Excel Services, IPFS, and BDC all require administrative (Central Admin) configuration in order for users to utilize these features in their sites. With BI tools: List templates and web parts are provisioned down to the Site Collection/Web level. So, at an admin level, it may be more difficult to report on enterprise feature "usage" at the site level.

    IMPORTANT: The process of deactivating the Enterprise Site features "feature" will remove web parts from the web part gallery, but it will NOT remove a list that is provisioned on the site (e.g. KPI List).